Saturday, February 27, 2010

Little Boy Blue

Hello everyone!
Here is a layout I managed to get done last weekend as well. This is my new product DT layout for Scrapaganza. They were putting out the new K & Company stuff as I was picking out what I wanted to use! LOL... This K & Company Poppyseed line is so pretty, I love the colors for my son's layouts, they are boyish enough yet pretty enough for girly layouts as well.  I ended up picking only one patterned sheet for this layout, and using coordinating embellishments to help pop the photos. Here are the details:

K & Company Poppyseed glittered dot paper
Bazzill Kraft cardstock
K & Company Poppyseed rub-ons
K & Company Handmade Fabric Swatches
American Crafts Thickers (the nekkid chipboard ones but you could use any)
My Little Yellow Bicycle mini alphas
Tattered Angels Glimmermist in Meadow Green and Sapphire
2 handmade buttons by the local button diva, Charlene
some cotton string
Cricut Cars cartridge for the background highway sign shape and Plantin for the scalloped edge

I stretched the highway sign shape a little to make it fill the 12x12 cardstock more, and cut that out. Then I glimmermisted it with green and let that dry. I welded the scallop strip on Plantin together so I'd get a 12 inch long one without huge scallops, and added those, my pictures, rubons. The first swatch of fabric on the pack from K&Co is lime green and white. Starting from the outside, I cut a 1/2 inch strip spiraling inward so that by the time I was done, I had a ribbon-like strip of fabric. I punched out a circle from the leftover Kraft cardstock and added some glue to the middle, and began twisting the fabric 'ribbon' and gluing and spiraling it outward on the punched circle till I had a fabric 'flower' circle to which I added the button.
 

Before adding the thickers title, I spritzed the chipboard letters with blue glimmermist. I really like them and I have a lot of letter stickers I had collected prior to me getting whole-heartedly into my cricut that I need to use up... I think I will be altering more letter stickers!
While making this layout, at almost every step my son wanted to do what I was doing.  So, by the time I was done, he was done with his scrapbook page! How cute is this! for a 3 year old!

 
I did the glimmermisting for him, and put the glue dots on the buttons but he picked out the paper, the title, the buttons, and placed everything on the layout himself.  And then he 'distressed' the page by hugging it and thus crinkling it up a bit. LOL!!!  Anyway, I was rather surprised at his sense of design, especially the buttons, he wanted them there in the big spot of glimmermist (the blue tended to be very generous and really saturated that one spot) and I thought that was a good spot for them. I think I might scraplift that idea from him.

He also gave me a great idea for one of the layouts I'm working on now, I hope this really does mean I have a future "Tim Holtz" designer in the making!

Thanks for looking!

Thursday, February 25, 2010

Thanks and a layout

First, I want to say a big THANK YOU to Sheila and Cindy! You both are so sweet! And so creative!!! Dang, I just went to your blogs and wow! some amazing work that I need to come back and study closer!  This weekend I will get that award up and do my assignment, I promise. :)

I've been so busy! I've been taking classes and teaching classes at my local store, Scrapaganza. Doing some commission work and trying to balance all that with spending time with the family. 3 year olds are amazingly wonderful and exhausting. I have so much fun with my son that I don't want to waste my opportunities to be with him. I've walked away from my scrap table a few times this week when he asked me to. (and the computer is at my table so that meant very little computer time too!)

However, I did get this layout done this past weekend! This is for my local store's blog challenge coming up in March but I'm posting a few days early (shhhh) because I used the sketch over at Stuck on You Sketches. :) I also used one of my new ironwork files (see post below) for the circle border. The picture is from my husband's and my wedding. Our wedding was themed, since we both enjoy renaissance faires and such, and back then I was very involved in belly dancing, so we combined a lot of our favorite things into our wedding, and for me one of them was to have full "Bridal" henna applied to hands, arms, legs and feet! So you can see my hand has henna decorations on it. Here are the details of the layout:

Kaiser printed paper - Sakura Park "Ukon"
Making Memories - Vintage Pearl Love Notes
Reminisce - black glitter paper
Cardstock - French Vanilla
Vellum - silver
Pearl bling
Perfect Pearls "Forever Red" and "Green Patina"

I used several Cricut cartridges:
Home Accents - part of the round border
Don Juan - part of the round border
Mother's Day 2010 - 6 petal flower, vine, title frame
Gypsy Font - hearts for butterfly and hearts
Gypsy Wanderings - title

The background fleur-de-lis circle border was created on my Gypsy with Home Accents and Don Juan, if you have the gypsy or Design Studio, you can download this cut file (see post below) to your own machine if you have the cartridges. The butterflies were also created on my Gypsy with Gypsy font by welding several ornate hearts together with an oval.
The roses were made by cutting out a 6 petaled flower 3 times and following the instructions from Tim Holtz' blog. I used Perfect Pearls and Perfect Medium and a water pen to color the petals and the vellum vine.

Thanks for looking! and thank you to everyone who has left comments, I really appreciate it!

Thursday, February 18, 2010

The Gypsy Ironworks


So last weekend I purchased the Martha Stewart "Iron Gate" punch around the page punches. I love them! But, if you've seen the punch, it's very small... lovely for cards or maybe around photo mats. But I also like large full page cuts and this punch would be lost going around a 12x12 page in my opinion. See? the top is the MS punch, the bottom is my newest gypsy project.


I was totally inspired by the punch to create larger versions on my gypsy to fit on 12x12 paper. So, here are the results of my week-long gypsy intensive!  Oh and by the way, these cut files are downloadable, and I've made both the .gypsy file and the Design Studio .cut file available.

Click here for the .gypsy cut file LGIrnSqr.PS.HA.DJ.MDRamsey.gypsy


Click here for the DS .cut file LGIrnSqr.PS.HA.DJ.MDRamsey.cut


Click here for the .gypsy cut file LGIrnBrdr.HA.DJ.MDRamsey.gypsy


Click here for the DS .cut file LGIrnBrdr.HA.DJ.MDRamsey.cut


Click here for the .gypsy cut file LGIrnRnd.PS.HA.DJ.MDRamsey.gypsy


Click here for the DS .cut file LGIrnRnd.PS.HA.DJ.MDRamsey.cut


Click here for the .gypsy cut file LGIrnRndBrdr.HA.DJ.MDRamsey.gypsy


Click here for the DS .cut file LGIrnRndBrdr.HA.DJ.MDRamsey.cut


Click here for the .gypsy cut file LGIrnOtrBrdr.PS.HA.DJ.MDRamsey.gypsy


Click here for the DS .cut file LGIrnOtrBrdr.PS.HA.DJ.MDRamsey.cut


If you download my files, please leave a comment to let me know! I love hearing from you!  Even better, if you use the cuts on your projects, I'd LOVE to see them! Come back and leave me a link! :)

 I actually did not get on my computer for several days, I was so busy gypsying. I was sad to see when I checked my email that The Gypsy Spot is no more. :(  I really enjoyed the blog and being on the DT. I'm sad it went away, though I totally understand the reason, as I've been there myself. Thank you to Nilda and the other DT ladies for the fun and the wonderful inspiration I got from that blog!

Tuesday, February 9, 2010

Gypsy Spot - altered mailbox

 
For the most part I'm not big into altering things for myself, or even for very many gifts. So when we got the assignment to alter the Target mailboxes for the Gypsy Spot, I thought, what am I going to do with this when I'm done? :)  Originally I thought I'd probably leave it at Scrapaganza as one of my DT store projects for them, but as the creative spirit led me to create this, I realized I was totally creating this for myself. I think this is perhaps the first altered project I have made specifically for myself that is not some sort of photo thing. Nope, this was just for me, just for fun. 

So, to start off, I picked out a red one because I'm not really a pink person, and I thought in the beginning maybe this would end up in Kevin's room or something maybe it should be red. I'm glad I chose red because when I was picking out papers, I went with Graphic 45 papers. The primary sheet of paper was from the recent christmas line, but the printed design is a stylized vine with heart shaped leaves - perfect for a valentine theme too. The back side of that paper also went well so I used it for a couple fill-in strips. The nice thing about G45 papers are that some of the color schemes are used in many of the paper lines, so you can mix papers too, so I used a sheet from another line for the flag.  I picked up the pompom trim at Scrapaganza a while back, and it was exactly what I wanted for this project.
 The big flowers and leaves are made from Tim Holtz grungepaper. I used Tim's last of the 12 tags tutorials to make the roses. I inked them with Fired Brick Distress ink, the leaves with Peeled Paint. The roses were stamped with Studio 490  background stamps. Both the roses and the leaves were cut out on my cricut. Grungepaper cuts like butter! With the GP, I just use my regular blade and multicut 2 to be sure the cut goes all the way through. I treat it like thin chipboard basically. Tip:  put the suede-like side of grungepaper/grungeboard on the mat, it adheres better to the mat and is less likely to move while cutting. The roses were cut with a 6 petaled flower on the recently released Mother's Day cartridge, and the leaf is from A Child's Year, and I made the leaves fatter on my gypsy. That flower from the Mother's Day cart is practically perfect, I had to do much less cutting than Tim's tutorial suggested, as the flower was basically cut just as needed.  The flower sizes shown here are 3.75" and 3" (though that is not how big the flowers are!). I had also cut a third, larger rose but after I made it I realized it overpowered the mailbox, so I did without it.  The little flowers are K&Co, and I found them at my local "everything's a dollar" store. (I bought every package they had muahaha!)

These stamps are all Studio 490 (Wendy Vecchi and Tim Holtz are my fav stamp designers, and I'm not really a big stamper, but Wendy's are my all time favs). I stamped these after I realized this mailbox was for me. :)  The metal parts are Tim Holtz.

Those stamp stickers were in my pile of "will I ever use these?" stickers. lol... I love when I use stash up. I hung one of Tim Holtz's fragments off the flag stop, on the back of the fragment is a bit I cut from one of the G45 papers. Making Memories mini-alphas are on the flag.

Here's a closeup of the fragment, and the bit that I put on the bottom of the flag. The clock is cut from one  of the G45 papers I had, then I covered it with a layer of crackle accents from Ranger. The paper curled a little from that so I had to flatten it as much as I could and glue it to a base of grungboard, which I inked so it wouldn't be real visible. 
And the back end of the mailbox. These are Wendy Vecchi's Studio 490 stamps. 
Thanks for looking!  Now I need to write some love notes to MYSELF! :)

And, as Wendy Vecchi says... "Make Art!"

Saturday, February 6, 2010

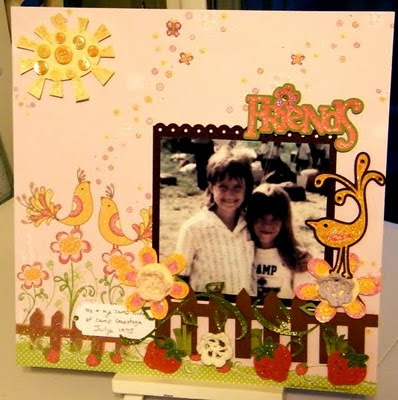
childhood friend

 
Here's a layout for the Scrapaganza DT. Cute new papers from Best Creations, and when I saw this glittered paper with the birds on it, I had to make a layout. I mean look at the paper, birds, fence, flowers, strawberries! How could I resist cutting all those things with my cricut to go with it! LOL

That cute sun with the buttons was not my idea. I saw some layouts by Sandy with that sun idea and had to 'lift it. I have tons of buttons to use up, and I think the sun is adorable.

I also used Stickles (diamond, yellow, lime green, fruit punch and lavender), buttons, bling, Fancy pants crocheted flowers, Martha Stewart fringe scissors, Fiskars threading water punch, Sizzix dots embossing folder, a couple eyelets.

The cricut stuff is:
Calligraphy Collection - journaling tag and the vine
Doodlecharms - sun and flowers
Home Decor - bird
My World - fence
Paisley - strawberries
Gypsy Wanderings - "friends"

It's hard to see in photos but in person the embellishments I cut look almost exactly like the glittered paper. It's the stickles, they are very close to the glitter on the papers. But it looks cool, as the cuts look like they are embellishments from the company almost and were meant to go with the paper.

Thanks for looking!

Thursday, February 4, 2010

Chocolate Love

 
 And now for something completely different! LOL... no really. It's a recent layout. The difference is using the brown satin and trying to make it look like chocolate syrup pouring down, like in the picture. I have never used fabric in this way.

I used Rusty Pickle Chocolate Covered Cherries papers, some of which I fussy cut. I used my cricut to cut the circle, "sweet", "candy" and the "100% pure" tags. These came from the George, Graphically Speaking and From my Kitchen carts. Also used mini alphas from My Little Shoebox, a "cake" bingo card that I cut off the back of the packaging of the larger bingo cards from Jenni Bowlin. I also had saved some of the flags from some hershey's kisses and stuck those in the layout.

Thanks for looking

Wednesday, February 3, 2010

Gypsy Spot - Valentine treat bag


I originally made this to sit at my desk and hold valentine candies. :)  But it got sidetracked LOL.

Our challenge at The Gypsy Spot this week was to make something with the new 3M self-adhesive paper that is endorsed by Cricut. Nilda sent me pink, black and green of this paper. I wasn't sure what to think of it, it seemed rather plain. After I made this project it occured to me that the plainness could be offset with stamps, glitters or embossing powders if one wanted to really gussy it up.

I did love how easy it was to work with. The settings that Nilda sent me (depth 4, pressure 3, speed 3) worked very well, though I might be inclined to slow the speed a little if the cuts were more intricate than what I did for the hearts on this project. The blade cut through the paper perfectly but didn't completely cut through the peel-off backing. This made it extremely easy to peel the cuts off, which is why it's perfect for kids. And also why I think it would be perfect for stamping. Do the cuts first, then stamp or otherwise decorate the paper then peel off the cuts...

I used Lovestruck to cut the scalloped hearts and Gypsy Font to cut the scroll hearts for a decorative layer. I can't remember which leaves those are, possibly Lyrical Letters? And the "bag" is Tags, Bags, Boxes and More. I cut 6 hearts for each stem, using a straw for the stems.

I like the black paper better because it was black all the way through, whereas the pink and green are only that color on one side, so when I stuck the pink hearts together, a few of their edges did not meet (my fault for not being a perfectionist that night) and I could see the white. I didn't have that problem with the black. I do also like the fact that the paper is re-positionable.

I found the paper at Joann's. I may buy some but only if I have a coupon. Well I never buy anything without a coupon anyway. :) But the stuff is a little pricey. However, with a coupon and the right project, this stuff could be very useful indeed.

Monday, February 1, 2010

Croppin' at ScrapbookDreamer!

Hey all, any of you like me and love to "crop" virtually?  What I mean is, I love the ScrapbookDreamer message board, and there's always wonderful challenges, great prizes and lots of scrappy freindship fun.  This month is ScrapbookDreamer's 6th anniversary!  To celebrate, the Dream team has wonderful challenges, games and chat planned for the whole month of February.  Laura, the store's owner has a grand prize of a $60 gift certificate for your very own shopping spree!!!  How cool is that!

Not to mention that if you join in on the fun, Laura likes to give out random prizes and RAKs, so you never know when someone is gonna get lucky.  I also have to say that SBD has a stellar design team. You really should wander over there and check out the Forum and the Gallery.

Look for me, my name there is "Michele-Dances" and my avatar is my most recent layout, "This Boy"!