Thursday, July 29, 2010

Back from CHA! Lots of pics!

I got back from CHA last night at midnight! My schedule only allowed me to get up there for tuesday evening and wednesday day, but boy did I have a fun time while I was there! I wish more of my pictures had turned out, but what I have, I'm posting now!

I arrived Tuesday evening just in time for the Provo Craft launch party for the new Cricut Imagine!
Standing in line!
Cocktail Party
Telling us about the new Cricut machine!
Entertainment - a Performance Painter SO COOL
Random weird hotel room art...
Doing the Tattered Angels Make and Take
Steampunk Scrapbooking @ Graphic45
Graphic45 booth
Graphic45 booth
Graphic45 booth
Can you tell I liked the Graphic45 booth? :)

Maya Road Booth
Stampers Anonymous Wendy Vecchi Art Parts and stamps
Heidi Swapp and Rhonna Farrer with me and Alisa
Tim Holtz!
Provo Craft Givaways!
Who can drive through Chicago without stopping at Ikea?
What a blast I had at my first CHA!  Next time I go, I want to be there at least a few days!

But wait! There's more! I won one of the new Cricut Imagine machines at the Provo Craft launch party! woot! I also won one of the new pink ATGs. How cool is that!  I got soooo much inspiration, saw so much new product I want to get my hands on.

I even got myself a new Expedit storage shelf from Ikea, someday my scraproom will be completely redone in those shelves! lol!

Friday, July 23, 2010

A few more layouts

I found this cute paper from American Crafts Abode line and came up with this simple layout. The big H is a chipboard H that is painted with Distress Crackle paint in Fired Brick. The rest of the title and the scallop border is cut on the cricut.


Another simple layout. I used Create a Critter for most of this. The top layer of wings is cut from the acrylic box that cricut cartridges come in, I glued them down and stickled them. The little charm came from Mini Monograms I think... not sure! I did a search on my gypsy for "charm" and came up with one. Though the dragonfly on the charm is from Create a Critter. Here's a closer view of the big dragonfly:
Thanks for looking!

Thursday, July 22, 2010

Tuesday Treats - House Swarming

Hello!  What's the buzz? :)  Today is my turn to show off on the Tuesday Treats blog! If you haven't been there before, you really should pay a visit every week! There are two projects posted every week and all by different designers, so you get a wonderful range of ideas and inspiration!


So my craft table is trashed, and this project is why. :)
This month the focus is on the Sentimentals cartridge. I thought at first I'd do a scrapbook page, as that is my main choice of projects, but I kept looking at this beehive and bee and couldn't come up with a page idea, but I did come up with a gift box idea.


The box is my 6 sided iris-lidded box that I designed last winter on my Gypsy, and offered up in this post on my blog. The downloadable gypsy file for the box is on that post as well as instructions for assembly of the box; so I won't go into detail about making the box base.  I love this box even though it isn't perfect, and I'm glad I'd created it because a hexagon box was perfect for a bee themed project. :)

So first I cut my box out in brown cardstock. (all cardstock and printed cardstock for this project is DCWV)
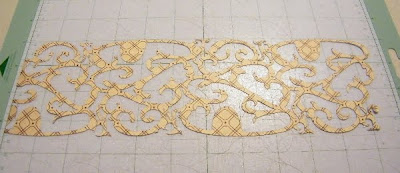
I apologize for the quality of the pictures of my gypsy screen. This is a view of the filigree cut that is layered over the box. It's actually the beehive filigree layer welded together a few times with another little scroll-y thing to fill in the spaces. Here's what it looks like cut out.
I ran the filigree through my 5" xyron and adhered it to the box. You can see the beehive shape a lot better below. On the gypsy, the filigree runs off the page. I did that ntentionally; partly because I had trouble seeing the box edge through the filigree layer to see how close to the edge I was. And partly because I was lazy and figured it would be easy to just snip off the excess filigree, which I did. You'll notice I did not allow the filigree to run over the tab that is used to adhere the box together.
Once the filigree was attached, I assembled the box as directed on my blog's box post. As I mentioned in that post, you have the option of the top closing with the iris concaved or with it sticking up. For my beehive box, I chose the top sticking up.
I created a small shaped card from the beehive on my gypsy. It is attached with tiny rectangles, and one beehive is flipped so that the front and back will match when they are folded together. Here's the gypsy screen of the little card.
After cutting out the card, I decided to try something I hadn't done before. Some time ago I had bought one of those mini marker holders and a marker set but I hadn't used them yet. I took the card off and flipped it white side up on the mat. Then on my gypsy I wrote out a sentiment message for the inside of the card, and had my cricut write the message with the mini marker. It worked okay. My positioning of the card wasn't quite exact but it was still okay. I do think I'd rather have the gel pen holder and the gel pens though. Here's the sentiment on my G:
You can see the inside of the card below.
After assembling the card and bee layers, I stickled them all (filigree only) with Cinnamon Stickles. Once they were dry, I wound some craft wire into springs and attached them to the backs of the bees and the back of the card.
I tied the card onto the box with ribbon, and I'm done!


This box is perfect for a candle or other small gift. I plan to buy a beeswax candle to go in the box. :)


Please visit this post on my blog to download JUST the box cut file and view assembly instructions.


Or, please go to this link to download the entire cut file for this project: box, bees, card and all.


Thank you for looking and I hope you enjoyed seeing this project!


Michele (aka dancingarden)

Tuesday, July 13, 2010

Butterflies on Glass

A lady came to the store I work at while I wasn't there and showed the owners a picture of a paper butterfly "sitting" on the edge of a wine glass, and asked if the store could help her make them for a wedding. Kelly and Beth turned to me, their cricut diva.  Of course I could provide! But only because I'd recently purchased the Lite cart, Bloom. Using my GiGi, the hide contour feature and the Bloom cart and Gypsy Font, I came up with these butterflies. I wasn't sure if the lady wants the details cut out or not so I made an example both ways. She also wanted the butterflies to have the tails and the Bloom cart butterfly did not have tails on it's wings, hence using Gypsy Font for the added little tails.

I'm charging her for my time designing this, but for you, my cricut peeps, of course the file is free! LOL


Butterflies for wine glasses  http://www.box.net/shared/xo8e7fm63k

Thanks for stopping by!

Saturday, July 10, 2010

More fun projects!

I got the newest kit for Scrapaganza's in-store kit club (Scrappinista Scrapbook Club) and had a blast desigining with it! My Little Yellow Bicycle's Boardwalk line - full of sunshine, beachy water and wonderful texture!  And I really mean texture... the papers have a fun fabric-y feel to them. The die-cut borders are canvas, and all the embellishments have interesting dimension and texture.  Here are my projects:

SeaWorld
I like working with themed papers, it allows me to dig into my stash of photos and get pictures scrapped!

Beach Babes?
I love this photo and I'm not ashamed to share it! Besides, this was 23 yrs ago. LOL

Photo Op
My mom lives in Florida while I live in Iowa, and neither of us can afford to visit each other often, so every photo of her and my son is a treasure to me.

Whenever I'm assigned to work with a kit, I set a personal goal to use up everything I can. I also like to make cards from the scraps but I'm also looking at ideas for gift-giving as well. A few months ago I was at Capadia's blog and discovered this post about making a folder for holding notecards made with a single sheet of cardstock. AWESOME! I love things like this and the folder comes out looking so professionally done. It's a keeper and several people on my gift list will be getting little folder boxes of cards this year!

Thank you for stopping by! Your comments are always appreciated and read! so if you have a question, feel free to ask. And please visit Capadia's blog to see that card folder, and all her other awesome work!

Monday, July 5, 2010

Some new stuff!

Well my i-rock is on it's way soon! (see previous post) so I can't wait to use it!

I thought I'd update with some more stuff I've done for Scrapaganza. I've been a busy little bee there but soon hope to get some time to participate in challenges on blogs and stuff. 


I just designed the make-n-takes for Scrapaganza's Day of Creativity on Saturday the 3rd. If you live in/near the Quad Cities, Day of Creativity happens every first saturday of the month and includes a free card make-n-take, a $4.99 project (the July 4th banner this time) and a $9.99 2 page spread.

Here are a couple more Get Your Scrap On make-n-takes that we have at Scrapaganza. Thanks to local scrapper Sandy for letting me "borrow" pictures of her girls, as I wanted to make these pretty pages but had no appropriate photos! :)
Thanks for looking! Don't give up on me, I am getting back in my groove again after being away from my blog! :D :D