1 day ago
Thursday, December 20, 2012
Dad "documented"
I've been thinking of my dad lately.
I had always admired the photos that "big name" scrappers had taken of dads walking with sons, especially from behind. It's like a special moment of intimacy that is so fleeting...
When I saw the opportunity to take this picture of my dad and my son walking together, I am sure I looked ridiculous running for the camera and stalking them like a mamarazzi. But I had to get this picture.
You see, a month before this was taken, my dad had a brain surgery to remove a cancerous tumor. This is one of the few times he actually got up from the couch to do anything, as he spent most of his time trying to recover. When I thought to take this picture, the thought "I may never get this chance again" crossed my mind.
I'm glad I got this picture... dad passed away the following July.
Still missing you Dad.
(this is a used my stash page!)
Tuesday, December 18, 2012
Good morning! It's my turn to post a project on the Cricut FANatics blog!
I love looking at quilts, and wish I had the patience for quilting myself. I've also seen a few scrapbookers use quilts as an inspiration for their pages. That that is where I too decided to look for inspiration!
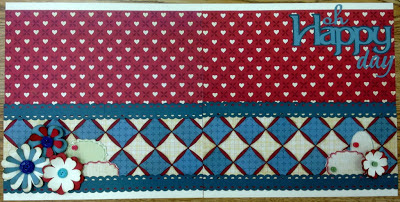
The bottom half of this layout is made with quite a few "squares" pieced together to look like a quilt. I cut half of them from a blue patterned printed paper and the other half of them from an off-white pattered paper. The "squares" are not true squares at all. The edges curve slightly inward. The shape is button 14 on CTMH Art Philosophy. The edges are inked to give them more depth. Behind these squares is red cardstock, to give the shapes a contrasting background.
The flowers come from Flower Shoppe; the words "oh" welded from Songbird, "Happy" from Cake Basics, and "day" from Graphically Speaking. Oh and the blue scallop border is also from Art Philosophy! I just cut two at an inch so that the two would equal 12".
I will say, getting the "squares" lined up like this was painstaking work at first. Repositionable adhesive tape really helped! But I think the result was worth it. I won't be able to cover the all that "quilting" with pictures, that's for sure!
Cricut Info and other supplies used:
Designed by Michele Donner-Ramsey
Cricut machines: Expression and Gypsy
Cartridges used: Cake Basics, Art Philosophy, Songbird, Graphically Speaking, Flower Shoppe
Supplies: Off-white and red colored cardstock, Printed cardstock, buttons, ink, adhesive
Sunday, December 16, 2012
Children of the World Swap
On the Cricut Circle message board, one of the members, "RockinRenee" hosted a swap using the Children of the World cartridge. There were 25 "children" on the cartridge, so as many ladies as were willing volunteered to make the children of their choice to fill all the slots. We each made 25 of the children, and sent them to Renee, who sorted them and sent us back one of each different child!
Naturally, having been a belly dancer, I wanted to make a child from one of the countries from which my favorite dance form originated. ;)
I forgot to take pictures in the early stages of construction, but I found it easiest to work in an assembly line fashion. I inked edges of all the donkey pieces and most of the Arabic girl's pieces first, then assembled.
At the end, after all was assembled, I added the final details with a fine tip gold paint pen, to put the gold "coin" decoration on her hijab and hem of her dress.
Best of all, I did this project with stuff from my stash!
Would you like to see all the other Children? :) RockinRenee took some great pictures of each one and posted on her blog: I came, I saw, I created so go check it out!!! They are all AWESOME!
Thanks for stopping by!
Sunday, December 9, 2012
the patch
Hello all!
Here's another Use Your Stash! layout. I used the last couple sheets from a cute line of papers I had... my favorite of that line was the bluish wood grain. Love it! Almost wished I had more! :) These are pumpkin patch pictures from this year... I still have a few years I haven't scrapped yet so don't get to thinking I'm "caught up" cuz that will never happen. LOL
Anyway, kept it simple to get it done. Not awesome but that's okay.
Thanks for stopping by!
Monday, December 3, 2012
Explore
Hello all!
Here's another "Use Your Stash" layout. This time I used some Kaiser paper with owls on it, you know, back from a few years back when owls were all the rage. :) But after I laid down the background papers, only one tiny owl face was actually peaking out from behind a photo. LOL...
So I used the remainders of the papers to try to fussy cut a few more owls... and one of the papers had some strips and tags, so I cut the tags out too, and they had owls... Then I found a WRM tag with an owl... and of course a Charlene's Button in the shape of an owl. I did like the owl craze, but yeah, they were everywhere. Anyway, this layout finished out these papers so that was good. (and no cricut!)
I was pleasantly surprised with these pictures, which the hubby took. Though he likes to take pictures, he doesn't often go to the trouble to work on composition or anything. These turned out awesome though.
Thanks for stopping by!
Saturday, December 1, 2012
Remember
Here's another layout I completed recently. This is another "Use your stash" layout! This is all old stash too! I am using more Kaiser papers, and a package of flowers, the word sticker and a postcard embellishment.
In 2007, my aunt passed away at the same time I was planning a trip to visit my mom, who hadn't seen my son since he was a little baby. I still went, as I knew mom would need help sorting through Aunt D's stuff. But I didn't take many pictures, as it was a sad time and we didn't get to do much fun stuff... in fact, these are all I took.
The little dimensional paper flowers are from K&CO, but they were originally off-white. They wouldn't have looked right on this layout since the printed papers have true white in them. So I misted the flowers with yellow mist while they were still on their sticker packaging, and then used some puffy white vinyl flourish stickers I got at Joann's. I rather like how they all turned out. And yes, there is a Charlene's button (the dragonfly, for those making sure I do my Charlene's button challenge). :)
Again, NO CRICUT cuts! lol
Subscribe to:
Comments (Atom)


